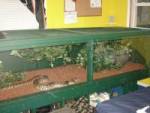
Example Reptile Cages and Terrariums built using the reptile cage plans book
These samples have all been built using the "How to Build Reptile Cages" eBook. Some are exactly as detailed, others were modified by the owners using a number of criteria. When you purchase the plans you can build a reptile cage to suit yourself or alter the designs to suit your needs. It's up to you and your imagination.
For example, owners altered the plans:
to
suit their needs
based on their access to the materials for building reptile cages
according
to their particular skill sets
depending
on the amount of time and effort they chose to invest
and
improved o them as their skills and knowledge increased.
Once you start and have the basic principles you just get better and better.
Example 1
I did use your plans as a reference for the one I did build which you can see in the pics. I actually spent alittle bit of money on this one but it was worth it. I used half inch thick glass for the sides and quarter inch thick plexi glass for the doors. It has a metal base and back base and the main backing is one inch thick Oak wood. I installed a toggle switch for the light and the heat admiter. and there is a one inch gap at the top for ventilation and there is about an eighth inch gap between all doors. I also built the base for it and stained it.
Robert Hansford
Discover the *exact* system an eBay millionaire used to earn $22,000+ a DAY!
The system contains a 237-page guidebook and over 4 hours of audio recordings of the newest and hottest strategies for earning a massive income on eBay -- up to $100,000 or MORE in your first year! To review Brandon's system, and discover exactly how you can start a FREE eBay account today, and earn profits by TOMORROW, click here now. |
Examples 2 & 3
I am sending you some photos of two cages I built using your plans and expanding my ideas. The snake cage is 66" long and 34" high to include the hood, with a 3/4" center divider. I don't think the King and Corn would get along in the same cage. Ha.
Thank you for your website and help.
Mike Douglass
Examples 4 & 5
I took a picture of both my recent snake cages that I have built.
The one with sliding glass doors that I designed myself with a few downfalls
and the larger, more recent drop down door cage using some more of the
information from your plans. The first was a 4'X2'X18" and the larger
one is 5'X3'X2'.
Jason Mansur
A few months back I purchased your "Reptile Cage Plans". I have been working on my cage on the weekends and am now near completion. All I need to do now is Purchase the Glass or Plexiglass for the sliding front door. I am very fascinated on how the cage ended up and thought I would share a couple of pictures with you. The pics are not of the "best" quality, for I haven't really figured out how to use my camera yet, but they show a couple of steps in my process. Upon completion, I plan on building another one. The second should be a little easier, for I have learned from mistakes on this one. Please reply on how you think my cage came out. I will have better pics later with the reptile enclosed. I will be sure to send them. Thanks for the ideas!!
The snake in the other cage will be in the tank. He is a Jungle Carpet Python. I have another Carpet that is a female. I will either put them together in this one, or just build another. As for mistakes, I think I made the walls a little bit too detailed. Therefore, it really took me a long time to fill in all of the "Nooks & Crannies" with the grout. Even now that it is finished, I can still see quite a few spots that I have missed, but if you stand back a few feet, they just disappear. Also, I pre-maturely drilled the hole in the top for the light. Even though it did help me see what I was doing in the grouting process, I didn't really think about a heat light. I am sure that there is still something I can do, but I guess I am good for now. There are actually 2 heat pads under the substrate that I hope will be sufficient. I also have a bit of fear that some of the grout will rub off when the snake is in contact, but I will have to see how that goes. I will investigate the fake tree idea and see how it looks. I think that where you are speaking of I have already put a waterbowl, but that can always be moved.
Another idea that I almost went with is adding some kind of a waterfall or something. When I was gluing the styrofoam to the walls, I was thinking of adding a bit more of a slope in the corner or something and then drilling a hole at the top of it. Then, running a waterpump to the hole and letting the water run down. I think that in the future, I will further investigate this option, for I think it would be an excellent idea. It could help with the humidity, but should probably be well thought out.
The other idea that we pondered was actually having a large enough tank to make a section of it a fish tank. Nothing fancy, but maybe some gold fish or small Koi fish. I will surely further investigate all of these and let you know of all feedback.
Rob Leeds
The first set of pictures are from the building and preparation stage. The next set show the snake, a female Jungle Carpet in the finished cage.
Example 8
I thought you would like to see how the cage turned out.
David Preston
 |
 |
 |
 |
 |
 |
Example 9
The reptile cage plans have section on making larger cages and infomation to determine sizes for larger cages. Using this information Annette D. was able to build a 10ft x 3ft x 3ft snake cage for their burmese python.
Example 10
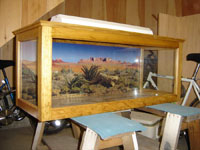
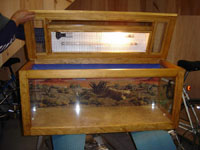
This cage was built for a bearded dragon. They decided to make the sides glass as well as the front and used a top with ventilation and built in lights to conceal them. They also found some suitable wall paper for that 'desert' feel. A very nice job.
 |
 |
 |
 |
Example 11
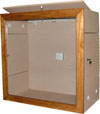
This cage was built using a single sheet of 8'x4' laminated MDF. It has two side opening doors and a lid at the top. The front provides uninterrputed viewing. The dimensions of the arboreal snake cage are 3' x 3' x 18".
 |
 |
Example 12
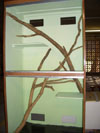
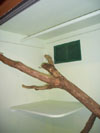
This cage was built from an old cupboard and converted using the reptile cage plans book as a basis for the build and a number of features, including the shleving and the sliding glass doors.
"I'd like to say the plans are great and very detailed. Even though I haven't built my cage from scratch (I've converted an old cupboard instead-see attached photos) I have found them to be invaluable."
"The dimensions of the new cage are 880mm W x 1790mm H x 550 D made of 3 ply. (On your advice from the plans I am installing 2 sliding 6mm thick glass doors, top and bottom on metal sliding tracks. As you can see in the photos I have put in two shelfs with 2 vents, top and bottom. The top shelf is 500mm from the roof. "
 |
 |
 |
Examples 13 & 14
The first is a snake cage that allows the snakes to crawl around on branches. The light is not a UV light but simply a small flourescent light. Note the powerboard on the side that has a timer for the lights. The heat mats have a separate thermostat that is at the back of the cage. The plans show you how to install branches in the snake cage and as well as you get the instructions to make the artificial trees.
The other two images are of the same reptile cage. The light is a UV light. The lizard, a bearded dragon, can bask under the basking light on the branches, as in one picture, or sit on the taller artificial tree as in the other image, which is very close to the UV light, allowing maximum exposure to the UV rays (within 6'').
Th cages have sliding doors but the reptile cage plans have instructions for sliding doors, hinged perpex or plexiglass doors and hinged, framed glass doors and vivarium construction ideas.
The plans also show you how to put castors on that will retain full
strength and support the cage effectively.
At right is the mesh lid that fits the home made
bearded dragon cage (top right). |
 |
|
| The bearded draon's cage roof is detachable
and is held in place by eylet hooks. It was made from an old flywire
window frame that was cut to size and refitted. The bearded dragon
cage top is hinged and the mesh section sits neatly into the open
area. |
||
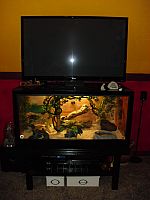
I couldn't have done this without your e-book. I was really sceptical, but figured I would only be out a few dollars, so I figured what the heck. Boy was I WRONG. I"m a 52 year old female credit manager with a little carpentry skills, and I built this, all by myself. It's awesome and wasn't hard to do. I took my time and did it right. I had this completed in 2 weekends. The existing table I was going to use wasn't working out, so I looked at the plans to make the stand, and a few hours later, TAA DAAAAH!! I've linked your web-site to the snake forum I belong to, so I hope they too buy this e-book. I can't say enough good things about this. Please feel to use this on your site if you would like to.
One VERY happy customer,
Gail
North Carolina, USA
 |
 |
Find out how to build homemade reptile cages, bearded dragon cages,
snake encosure designs and arboreal cages. Full color pictures, detailed
diagrams and easy to follow, step-by-step instructions.
http://www.reptile-cage-plans.com
 This
is the SAME system that self-made millionaire Brandon Dupsky used
to go from selling "useless" stuff
he found in his basement, to earning $8 MILLION last year
alone on eBay!


